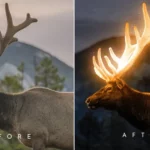
How to Create Cinematic Manipulation in Photoshop
Creating a cinematic manipulation in Photoshop involves combining elements to evoke a cinematic atmosphere, often inspired by movie posters or scenes. Here’s a step-by-step guide to help you create a cinematic manipulation:
1: Collect Resources
- Gather Images:
- Collect high-resolution images that fit your cinematic theme. This may include a background, main subject, and additional elements.
- Consider Lighting:
- Ensure that lighting in the images is consistent or can be adjusted to match a cinematic feel.
2: Set Up Your Document
- Open Photoshop:
- Launch Adobe Photoshop and create a new document with dimensions suitable for your project.
- Import Images:
- Open the images you collected and arrange them in separate layers in your Photoshop document.
3: Create a Cinematic Atmosphere
- Adjust Colors:
- Use adjustment layers like Color Balance, Gradient Map, or Photo Filter to enhance or modify colors to create a cinematic look.
- Apply Gradients:
- Consider adding gradients to simulate cinematic lighting. Use the Gradient Tool or Gradient Adjustment Layer for this.
4: Blend Elements Seamlessly
- Work with Blending Modes:
- Experiment with blending modes on different layers. Modes like Overlay, Soft Light, and Multiply can create cinematic effects.
- Refine Edges:
- Use layer masks and the Brush Tool to refine the edges of your elements, ensuring they blend seamlessly.
5: Add Cinematic Effects
- Apply Filters:
- Use filters like Camera Raw Filter or Lens Flare (Filter > Render) to add cinematic effects. Adjust the settings for a realistic look.
- Texture Overlay:
- Apply a subtle texture overlay to add depth and a vintage feel. Set the texture layer to Overlay or Soft Light blending mode.
6: Enhance Lighting and Shadows
- Create Shadows:
- Add realistic shadows to your main subject to ground it in the scene. Use the Brush Tool or Gradient Tool with low opacity.
- Adjust Highlights:
- Enhance highlights on certain elements to create a cinematic glow. Use the Dodge Tool or add a new layer with a soft brush set to Overlay.
7: Add Typography (Optional)
- Include Movie Title or Text:
- If creating a movie poster, add text for the movie title and credits. Use bold fonts and consider effects like bevels or drop shadows.
8: Finalize and Export
- Fine-Tune Details:
- Zoom in and fine-tune details, ensuring everything looks cohesive and polished.
- Save and Export:
- Save your Photoshop document (.PSD) and then export the final image in your desired format (JPEG, PNG, etc.).
Additional Tips:
- Study Cinematic References:
- Look at movie posters and cinematic artwork for inspiration. Analyze the color grading, lighting, and composition.
- Experiment with Filters:
- Use filters like the Oil Paint filter or various Photoshop actions to experiment with different looks.
- Use Adjustment Layers:
- Adjustments layers offer non-destructive editing. Experiment with Curves, Levels, and Hue/Saturation to refine colors.
- Consider Composition:
- Pay attention to composition. Place your main subject strategically, and use leading lines or focal points to guide the viewer’s eye.
Creating a cinematic manipulation is a creative process, so feel free to experiment with different techniques and effects until you achieve the desired cinematic atmosphere.
How to Create Cinematic Manipulation in Photoshop
Mixtapepsds Photoshop Tutorials
Video Source

Related Post

Jan 27, 2024
How to Make a Mixtape Cover
Published by Jules Mercado How to Edit a Mixtape Cover using..
Comments Off on How to Make a Mixtape Cover

Jan 12, 2024
Inverse Curve Technique for Painting Light In Photoshop Video
Written by: Jules Mercado (Mixtapepsds) The inverse curve te..
Comments Off on Inverse Curve Technique for Painting Light In Photoshop Video

Jan 12, 2024
3 Ways to Add Depth to Your Composite in Photoshop Video
3 Ways to Add Depth to Your Composite in Photoshop Depth to ..
Comments Off on 3 Ways to Add Depth to Your Composite in Photoshop Video

Jan 12, 2024
Advanced Hair Masking with Channels in Photoshop Video
Advanced Hair Masking with Channels in Photoshop Video. Crea..
Comments Off on Advanced Hair Masking with Channels in Photoshop Video

Jan 10, 2024
Master Brush Tool from Start to Finish in Photoshop Video
Master Brush Tool from Start to Finish in Photoshop Video Ma..
Comments Off on Master Brush Tool from Start to Finish in Photoshop Video

Jan 10, 2024
How to Blend Images and Composites with Photoshop Video
10-Step GUIDE: How to Blend Images and Composites with Photo..
Comments Off on How to Blend Images and Composites with Photoshop Video

Jan 08, 2024
How To Cut Anything Out in Photoshop Video
How To Cut Anything Out in Photoshop Welcome to our comprehe..
Comments Off on How To Cut Anything Out in Photoshop Video

Jan 08, 2024
How to use the Toolbar in Photoshop Tutorial Video
How to use the Toolbar in Photoshop Tutorial Using the Toolb..
Comments Off on How to use the Toolbar in Photoshop Tutorial Video

Jan 08, 2024
13 Photo Manipulation Tips in Photoshop Video
13 Photo Manipulation Tips in Photoshop: 1. Understand Basic..
Comments Off on 13 Photo Manipulation Tips in Photoshop Video

Jan 08, 2024
How to Create a Typography using Masking Effect
How to create a Typography using Masking Effect: How to crea..
Comments Off on How to Create a Typography using Masking Effect