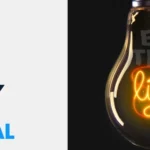
Creating Neon Light Effect in Photoshop
► Portrait photo by Harsh Kushwaha – https://spoon.graphics/2Q8w0Ws
► Krist’s Smoke Brushes – https://spoon.graphics/2GeYjw7
► Download my Free Grain Textures – http://spoon.graphics/1kEqt49
Creating a neon light effect in Photoshop involves combining layer styles, blending modes, and gradients to simulate the vibrant and glowing appearance of neon lights. Here’s a step-by-step guide:
1: Set Up Your Document
- Open Photoshop:
- Launch Adobe Photoshop on your computer.
- Create a New Document:
- Go to
File > Newto create a new document. Choose the dimensions and resolution based on your project.
- Go to
- Choose a Dark Background:
- Select a dark background color or add a dark gradient to the background layer.
2: Create Text or Shapes
- Add Text or Shapes:
- Use the Text tool (T) to type the text or create shapes that you want to turn into neon lights.
- Select Bold Fonts:
- Choose bold fonts that will give a strong presence to the neon effect. Sans-serif fonts often work well.
- Adjust Size and Position:
- Resize and position the text or shapes as desired on the canvas.
3: Apply Layer Styles
- Right-Click and Choose “Blending Options”:
- Right-click on the text or shape layer and choose “Blending Options.”
- Add Outer Glow:
- Check the “Outer Glow” option and adjust the settings.
- Blend Mode: Screen
- Opacity: 100%
- Color: Choose a vibrant color for the neon glow.
- Size: Adjust the size to control the spread of the glow.
- Check the “Outer Glow” option and adjust the settings.
- Add Inner Glow (Optional):
- You can add an “Inner Glow” if you want a more intense effect.
- Blend Mode: Screen
- Opacity: 100%
- Color: Same as the outer glow
- Size: Adjust as needed
- You can add an “Inner Glow” if you want a more intense effect.
4: Duplicate Layers
- Duplicate the Text or Shape Layer:
- Right-click on the text or shape layer and choose “Duplicate Layer.”
- Adjust Size (Optional):
- Scale the duplicated layer slightly larger than the original. This creates a double-glow effect.
5: Create a Reflection (Optional)
- Duplicate Layers for Reflection:
- Duplicate the text or shape layer(s) again.
- Flip the Duplicated Layers Vertically:
- Go to
Edit > Transform > Flip Verticalto flip the duplicated layers vertically.
- Go to
- Move Below Original Layers:
- Move the flipped layers below the original text or shape layers to create a reflection effect.
6: Colorize with Gradients (Optional)
- Create a New Layer:
- Create a new layer above the background.
- Draw a Gradient:
- Use the Gradient tool (G) to draw a gradient from the bottom to the top of the canvas. Choose colors that complement the neon glow.
- Set Blend Mode to Overlay:
- Change the blend mode of the gradient layer to “Overlay” for a colorizing effect.
7: Final Adjustments
- Add Additional Elements (Optional):
- Enhance the composition by adding elements like stars, lines, or circles for extra flair.
- Adjust Opacity:
- Fine-tune the overall intensity by adjusting the opacity of layers if needed.
- Apply Filters (Optional):
- Experiment with filters such as “Gaussian Blur” to add a soft glow or “Noise” for texture.
8: Save Your Design
- Save Your Work:
- Save your neon light effect design as a Photoshop (.psd) file for future editing.
- Export as Image:
- Export the final design as an image (e.g., JPEG or PNG) for sharing or printing.
Feel free to experiment with different colors, fonts, and shapes to create various neon light effects. This basic guide provides a starting point, and you can customize the details based on your specific design preferences.
Mixtapepsds Photoshop Tutorials
Video Source
Related Post

Jan 27, 2024
How to Make a Mixtape Cover
Published by Jules Mercado How to Edit a Mixtape Cover using..
Comments Off on How to Make a Mixtape Cover

Jan 12, 2024
Inverse Curve Technique for Painting Light In Photoshop Video
Written by: Jules Mercado (Mixtapepsds) The inverse curve te..
Comments Off on Inverse Curve Technique for Painting Light In Photoshop Video

Jan 12, 2024
3 Ways to Add Depth to Your Composite in Photoshop Video
3 Ways to Add Depth to Your Composite in Photoshop Depth to ..
Comments Off on 3 Ways to Add Depth to Your Composite in Photoshop Video

Jan 12, 2024
Advanced Hair Masking with Channels in Photoshop Video
Advanced Hair Masking with Channels in Photoshop Video. Crea..
Comments Off on Advanced Hair Masking with Channels in Photoshop Video

Jan 10, 2024
Master Brush Tool from Start to Finish in Photoshop Video
Master Brush Tool from Start to Finish in Photoshop Video Ma..
Comments Off on Master Brush Tool from Start to Finish in Photoshop Video

Jan 10, 2024
How to Blend Images and Composites with Photoshop Video
10-Step GUIDE: How to Blend Images and Composites with Photo..
Comments Off on How to Blend Images and Composites with Photoshop Video

Jan 08, 2024
How To Cut Anything Out in Photoshop Video
How To Cut Anything Out in Photoshop Welcome to our comprehe..
Comments Off on How To Cut Anything Out in Photoshop Video

Jan 08, 2024
How to use the Toolbar in Photoshop Tutorial Video
How to use the Toolbar in Photoshop Tutorial Using the Toolb..
Comments Off on How to use the Toolbar in Photoshop Tutorial Video

Jan 08, 2024
13 Photo Manipulation Tips in Photoshop Video
13 Photo Manipulation Tips in Photoshop: 1. Understand Basic..
Comments Off on 13 Photo Manipulation Tips in Photoshop Video

Jan 08, 2024
How to Create a Typography using Masking Effect
How to create a Typography using Masking Effect: How to crea..
Comments Off on How to Create a Typography using Masking Effect