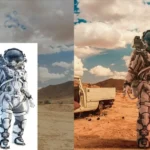
How to Match Color and Light in Photoshop!
How to Match Color and Light in Photoshop:
Matching color and light in Photoshop is crucial when working with composite images or combining elements from different sources. Here’s a step-by-step guide on how to match color and light in Photoshop:
1: Using Adjustment Layers
- Open Your Images:
- Open the images you want to work with in Photoshop.
- Select Base Image:
- Choose one image as the base or reference image.
- Add Adjustment Layers:
- Add adjustment layers to the other images to match their colors and tones with the base image.
- Common adjustment layers include:
- Color Balance: Adjust the balance of colors in the shadows, midtones, and highlights.
- Curves or Levels: Fine-tune the overall brightness and contrast.
- Hue/Saturation: Adjust specific colors or desaturate them.
- Common adjustment layers include:
- Add adjustment layers to the other images to match their colors and tones with the base image.
- Clip Adjustment Layers:
- Clip adjustment layers to specific layers by holding Alt and clicking between the adjustment layer and the layer below. This ensures that adjustments only affect the intended layer.
- Use Layer Masks:
- Use layer masks to selectively apply adjustments. Paint on the layer mask with black to hide adjustments in specific areas.
2: Color Match Tool
- Open Images:
- Open the images you want to match in Photoshop.
- Select the Base Image:
- Choose the image that represents the desired color and lighting as the base.
- Go to Image > Adjustments > Match Color:
- Select the base image as the “Source” and the target image as the “Layer.”
- Adjust Options:
- Experiment with the options in the Match Color dialog box, such as Luminance and Color Intensity, to achieve a match.
- Refine with Layer Masks:
- After applying the Match Color, use layer masks to refine specific areas. Mask out parts that shouldn’t be affected.
3: Gradient Map Adjustment Layer
- Open Images:
- Open the images you want to work with in Photoshop.
- Add Gradient Map Adjustment Layer:
- Add a Gradient Map adjustment layer above the images.
- Choose a Neutral Gradient:
- Choose a gradient that ranges from black to white. This helps balance the color tones.
- Blend Mode and Opacity:
- Change the blend mode of the Gradient Map layer to “Color” or “Soft Light.”
- Adjust the opacity to control the strength of the color correction.
- Mask and Fine-Tune:
- Use layer masks to mask out areas that should not be affected by the gradient map.
- Fine-tune the colors by adjusting the colors in the gradient editor.
Tips:
- Use Reference Points:
- Identify specific areas in your base image that represent accurate colors and tones. Use these as reference points when adjusting other images.
- Check Histograms:
- Check the histograms of different images to ensure a similar distribution of tones.
- Sample Colors:
- Use the Eyedropper tool to sample colors from one image and apply them to another.
- Experiment with Blending Modes:
- Experiment with blending modes like “Color,” “Hue,” or “Luminosity” to achieve different effects.
- Consider Ambient Lighting:
- Pay attention to the ambient lighting in each image and match it for a realistic blend.
Matching color and light in Photoshop is an iterative process that involves careful adjustments and constant evaluation. Practice and experimentation will help you develop a better understanding of how to achieve cohesive results across multiple images.
How to Match Color and Light in Photoshop
Mixtapepsds Photoshop Tutorials
Video Source

Related Post

Jan 27, 2024
How to Make a Mixtape Cover
Published by Jules Mercado How to Edit a Mixtape Cover using..
Comments Off on How to Make a Mixtape Cover

Jan 12, 2024
Inverse Curve Technique for Painting Light In Photoshop Video
Written by: Jules Mercado (Mixtapepsds) The inverse curve te..
Comments Off on Inverse Curve Technique for Painting Light In Photoshop Video

Jan 12, 2024
3 Ways to Add Depth to Your Composite in Photoshop Video
3 Ways to Add Depth to Your Composite in Photoshop Depth to ..
Comments Off on 3 Ways to Add Depth to Your Composite in Photoshop Video

Jan 12, 2024
Advanced Hair Masking with Channels in Photoshop Video
Advanced Hair Masking with Channels in Photoshop Video. Crea..
Comments Off on Advanced Hair Masking with Channels in Photoshop Video

Jan 10, 2024
Master Brush Tool from Start to Finish in Photoshop Video
Master Brush Tool from Start to Finish in Photoshop Video Ma..
Comments Off on Master Brush Tool from Start to Finish in Photoshop Video

Jan 10, 2024
How to Blend Images and Composites with Photoshop Video
10-Step GUIDE: How to Blend Images and Composites with Photo..
Comments Off on How to Blend Images and Composites with Photoshop Video

Jan 08, 2024
How To Cut Anything Out in Photoshop Video
How To Cut Anything Out in Photoshop Welcome to our comprehe..
Comments Off on How To Cut Anything Out in Photoshop Video

Jan 08, 2024
How to use the Toolbar in Photoshop Tutorial Video
How to use the Toolbar in Photoshop Tutorial Using the Toolb..
Comments Off on How to use the Toolbar in Photoshop Tutorial Video

Jan 08, 2024
13 Photo Manipulation Tips in Photoshop Video
13 Photo Manipulation Tips in Photoshop: 1. Understand Basic..
Comments Off on 13 Photo Manipulation Tips in Photoshop Video

Jan 08, 2024
How to Create a Typography using Masking Effect
How to create a Typography using Masking Effect: How to crea..
Comments Off on How to Create a Typography using Masking Effect