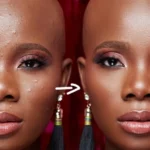
HOW to WHITEN TEETH and EYES in Photoshop
Whitening teeth and eyes in Photoshop involves using various adjustment layers and tools to enhance the brightness and color of these features in a portrait. Here’s a step-by-step guide:
Whitening Teeth:
- Open Your Image:
- Launch Photoshop and open the portrait image you want to edit.
- Duplicate the Background Layer:
- Right-click on the Background layer in the Layers panel and choose “Duplicate Layer.” This ensures you have a copy to work on.
- Create a Hue/Saturation Adjustment Layer:
- Click on the “Create new fill or adjustment layer” icon at the bottom of the Layers panel and choose “Hue/Saturation.”
- Adjust the Saturation slider to the left to desaturate the image slightly.
- Create a Curves Adjustment Layer:
- Again, click on the “Create new fill or adjustment layer” icon and choose “Curves.”
- Create a slight upward curve to brighten the overall image.
- Create a Mask for Teeth Whitening:
- Click on the mask of the Curves adjustment layer.
- Use the Brush tool (B) with a soft brush and black color to paint over the teeth, revealing the whitening effect.
- Fine-Tune with Levels:
- Add a Levels adjustment layer for additional fine-tuning.
- Adjust the white point slider to enhance the brightness.
Whitening Eyes:
- Duplicate the Background Layer:
- Duplicate the background layer again to work on a new copy.
- Create a Hue/Saturation Adjustment Layer:
- Add a Hue/Saturation adjustment layer and desaturate the image slightly.
- Create a Curves Adjustment Layer:
- Add a Curves adjustment layer and create an upward curve to brighten the image.
- Create a Mask for Eye Whitening:
- Click on the mask of the Curves adjustment layer.
- Use the Brush tool with a soft brush and black color to paint over the eyes, revealing the whitening effect.
- Enhance Eye Highlights:
- Create a new layer and set the blending mode to “Overlay.”
- Use the Dodge tool (O) to brighten the highlights in the eyes. Be subtle to avoid an unnatural look.
- Fine-Tune with Levels:
- Add a Levels adjustment layer for additional fine-tuning.
- Adjust the white point slider to enhance the brightness.
General Tips:
- Zoom In for Precision:
- Zoom in while working on details like teeth and eyes for better precision.
- Adjust Opacity:
- If the whitening effect appears too strong, reduce the opacity of the adjustment layers.
- Use a Soft Brush:
- Use a soft brush with low opacity when painting on masks to create smooth transitions.
- Check Before and After:
- Toggle the visibility of adjustment layers to check the before and after, ensuring the changes look natural.
- Save a Copy:
- Before making extensive changes, save a copy of your original image to preserve the original.
Remember, subtlety is key when retouching portraits to avoid an overly edited appearance. Aim for a natural enhancement that complements the overall look of the image.
HOW to WHITEN TEETH and EYES in Photoshop
Mixtapepsds Photoshop tutorials
Video Source
Related Post

Jan 27, 2024
How to Make a Mixtape Cover
Published by Jules Mercado How to Edit a Mixtape Cover using..
Comments Off on How to Make a Mixtape Cover

Jan 12, 2024
Inverse Curve Technique for Painting Light In Photoshop Video
Written by: Jules Mercado (Mixtapepsds) The inverse curve te..
Comments Off on Inverse Curve Technique for Painting Light In Photoshop Video

Jan 12, 2024
3 Ways to Add Depth to Your Composite in Photoshop Video
3 Ways to Add Depth to Your Composite in Photoshop Depth to ..
Comments Off on 3 Ways to Add Depth to Your Composite in Photoshop Video

Jan 12, 2024
Advanced Hair Masking with Channels in Photoshop Video
Advanced Hair Masking with Channels in Photoshop Video. Crea..
Comments Off on Advanced Hair Masking with Channels in Photoshop Video

Jan 10, 2024
Master Brush Tool from Start to Finish in Photoshop Video
Master Brush Tool from Start to Finish in Photoshop Video Ma..
Comments Off on Master Brush Tool from Start to Finish in Photoshop Video

Jan 10, 2024
How to Blend Images and Composites with Photoshop Video
10-Step GUIDE: How to Blend Images and Composites with Photo..
Comments Off on How to Blend Images and Composites with Photoshop Video

Jan 08, 2024
How To Cut Anything Out in Photoshop Video
How To Cut Anything Out in Photoshop Welcome to our comprehe..
Comments Off on How To Cut Anything Out in Photoshop Video

Jan 08, 2024
How to use the Toolbar in Photoshop Tutorial Video
How to use the Toolbar in Photoshop Tutorial Using the Toolb..
Comments Off on How to use the Toolbar in Photoshop Tutorial Video

Jan 08, 2024
13 Photo Manipulation Tips in Photoshop Video
13 Photo Manipulation Tips in Photoshop: 1. Understand Basic..
Comments Off on 13 Photo Manipulation Tips in Photoshop Video

Jan 08, 2024
How to Create a Typography using Masking Effect
How to create a Typography using Masking Effect: How to crea..
Comments Off on How to Create a Typography using Masking Effect