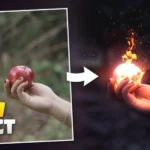
How to Create a Dispersion Effect in Photoshop
Creating a dispersion effect in Photoshop involves making an object or subject appear as if it’s breaking apart into particles or fragments. Here’s a step-by-step guide:
1: Open Your Image
- Open the image you want to apply the dispersion effect to in Photoshop.
2: Duplicate the Layer
- Duplicate the layer by right-clicking on the background layer in the Layers panel and selecting “Duplicate Layer.”
3: Select the Subject
- Use the Pen Tool (P) or any selection tool of your choice to carefully select the subject or object you want to disperse. Make a precise selection around the edges.
4: Add a Layer Mask
- With the subject selected, click on the “Add Layer Mask” icon at the bottom of the Layers panel. This will create a layer mask based on your selection.
5: Duplicate the Layer Again
- Duplicate the layer with the layer mask by right-clicking and selecting “Duplicate Layer.”
6: Apply Filter > Liquify
- With the duplicated layer selected, go to
Filter > Liquify.Use the Forward Warp Tool (W) to push and distort the duplicated layer, creating a sense of dispersion. Pay attention to the direction in which you want the particles to scatter.
7: Use the Smudge Tool (Optional)
- If needed, use the Smudge Tool (R) to further refine the dispersion effect. This tool can help in stretching and smearing the edges of the dispersed particles.
8: Adjust Layer Opacity
- Adjust the opacity of the duplicated and liquified layer to control the intensity of the dispersion effect. Lower the opacity for a more subtle look.
9: Create Particle Trails (Optional)
- To enhance the dispersion effect, you can create particle trails. Use the Pen Tool to draw irregular shapes resembling particles shooting away from the dispersed subject.
10: Add Blur (Optional)
- Apply a motion blur to the particle trails or the dispersed subject. Go to
Filter > Blur > Motion Blurand adjust the angle and distance to simulate movement.
11: Add Adjustment Layers
- Add adjustment layers such as “Hue/Saturation” or “Color Balance” to match the color and tone of the dispersed particles with the surrounding environment.
12: Fine-Tune and Refine
- Fine-tune the dispersion effect by adjusting the layer masks, refining edges, and making additional adjustments to achieve the desired look.
13: Save and Export
- Once satisfied, save your work and export the image in your preferred format.
Tips:
- Experiment with Distortion:
- Try different distortion settings in the Liquify filter to achieve various dispersion effects.
- Vary Particle Sizes:
- Vary the size of the particles for a more realistic and dynamic look.
- Consider Background:
- Pay attention to the background and adjust the dispersion effect accordingly to make it appear natural.
- Use Brushes for Particles:
- Instead of manually drawing particle trails, you can use custom brushes or particle brushes for a quicker and more varied result.
Creating a dispersion effect in Photoshop allows for creative and dramatic visual effects. Experiment with the tools and settings to achieve the specific dispersion look you envision.
How to Create a Dispersion Effect in Photoshop
Mixtapepsds Photoshop Tutorials
Video Source
Related Post

Jan 27, 2024
How to Make a Mixtape Cover
Published by Jules Mercado How to Edit a Mixtape Cover using..
Comments Off on How to Make a Mixtape Cover

Jan 12, 2024
Inverse Curve Technique for Painting Light In Photoshop Video
Written by: Jules Mercado (Mixtapepsds) The inverse curve te..
Comments Off on Inverse Curve Technique for Painting Light In Photoshop Video

Jan 12, 2024
3 Ways to Add Depth to Your Composite in Photoshop Video
3 Ways to Add Depth to Your Composite in Photoshop Depth to ..
Comments Off on 3 Ways to Add Depth to Your Composite in Photoshop Video

Jan 12, 2024
Advanced Hair Masking with Channels in Photoshop Video
Advanced Hair Masking with Channels in Photoshop Video. Crea..
Comments Off on Advanced Hair Masking with Channels in Photoshop Video

Jan 10, 2024
Master Brush Tool from Start to Finish in Photoshop Video
Master Brush Tool from Start to Finish in Photoshop Video Ma..
Comments Off on Master Brush Tool from Start to Finish in Photoshop Video

Jan 10, 2024
How to Blend Images and Composites with Photoshop Video
10-Step GUIDE: How to Blend Images and Composites with Photo..
Comments Off on How to Blend Images and Composites with Photoshop Video

Jan 08, 2024
How To Cut Anything Out in Photoshop Video
How To Cut Anything Out in Photoshop Welcome to our comprehe..
Comments Off on How To Cut Anything Out in Photoshop Video

Jan 08, 2024
How to use the Toolbar in Photoshop Tutorial Video
How to use the Toolbar in Photoshop Tutorial Using the Toolb..
Comments Off on How to use the Toolbar in Photoshop Tutorial Video

Jan 08, 2024
13 Photo Manipulation Tips in Photoshop Video
13 Photo Manipulation Tips in Photoshop: 1. Understand Basic..
Comments Off on 13 Photo Manipulation Tips in Photoshop Video

Jan 08, 2024
How to Create a Typography using Masking Effect
How to create a Typography using Masking Effect: How to crea..
Comments Off on How to Create a Typography using Masking Effect